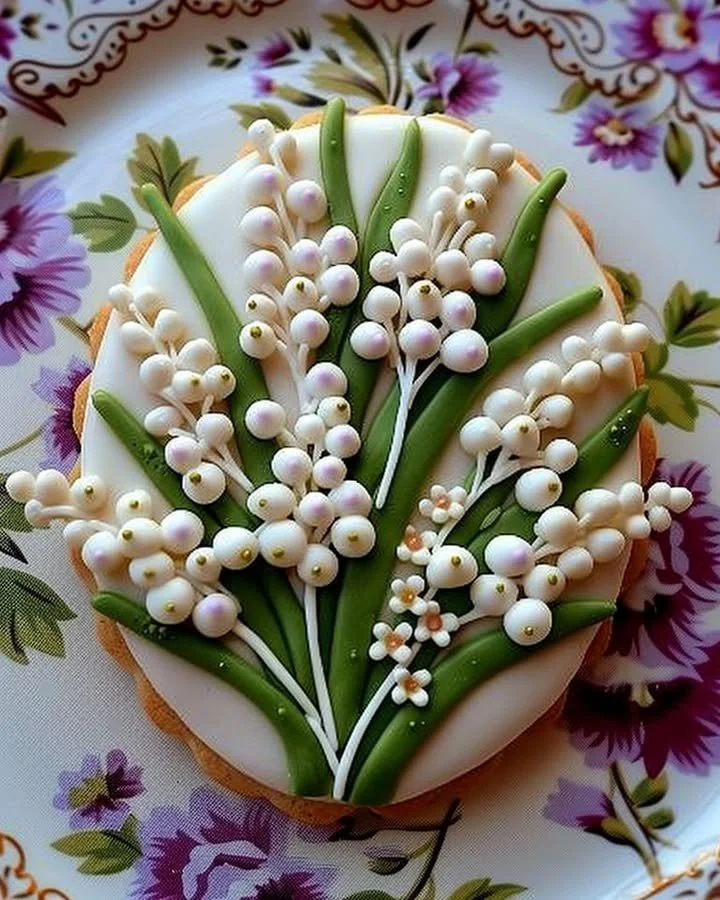
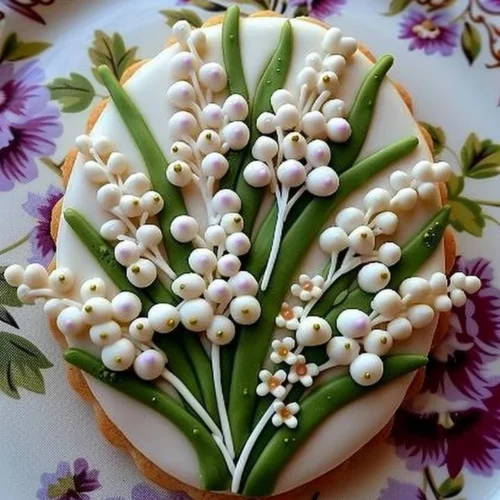
Lily of the Valley Decorated Sugar Cookies
The Lily of the Valley Decorated Sugar Cookies are a delightful treat that invites your senses to celebrate both the artistry of baking and the beauty of nature. This recipe brings together a familiar sweetness with a gentle touch of floral design, reminiscent of springtime blooms. The moment you mix flour with creamy butter and sugar, you’ll be enveloped in an aromatic embrace that’s both nostalgic and exhilarating. As you bake these cookies, your kitchen will fill with the warm, buttery scent of freshly baked goodies, culminating in a moment of anticipation as you prepare to decorate them with delicate, pastel royal icing. Each bite reveals a tender texture that melts in your mouth, and the intricate designs invite not just taste but fascination and admiration. Join me on this step-by-step journey to create these show-stopping cookies that not only taste divine but also look like little works of art.
History / Fun Fact
The charm of sugar cookies can be traced back to early settlers of the United States who brought with them traditional recipes from Europe. These delightful cookies were often shaped and decorated for various celebrations, gaining immense popularity by the late 19th century. The particular inspiration for the Lily of the Valley Decorated Sugar Cookies comes from the sweet, delicate flowers that bloom in the spring, which symbolize purity and humility. Often associated with May Day celebrations, these charming flowers have been embraced in many cultural traditions. By turning these beloved blossoms into edible art, we can pay homage to their timeless beauty while creating memorable moments with loved ones—one cookie at a time.
Ingredients
To create these exquisite Lily of the Valley Decorated Sugar Cookies, gather the following ingredients, each bringing its own unique character to the mix:
- 2 3/4 cups all-purpose flour: This finely milled flour creates a tender base for your cookies with a delicate crumb.
- 1 teaspoon baking soda: This ingredient ensures a light and airy texture, giving the cookie its well-loved structure.
- 1/2 teaspoon baking powder: A key player in achieving that perfect rise and fluffiness.
- 1 cup unsalted butter, softened: Rich and creamy, butter contributes a luxurious texture and depth of flavor.
- 1 1/2 cups sugar: This will add sweetness and that irresistible crisp edge.
- 1 egg: Binding everything together while adding moisture to the dough.
- 1 teaspoon vanilla extract: A fragrant touch that enhances the sweetness and offers warmth to the flavor.
- 1 teaspoon almond extract: The nutty undertones playfully complement the primary flavors.
- 1/2 teaspoon salt: A pinch that enhances all the other delicious flavors.
- 2-3 tablespoons milk: To adjust the dough’s consistency, ensuring it’s pliable and easy to work with.
- White and green royal icing: This vibrant icing transforms ordinary cookies into stunning masterpieces with lifelike designs.
Cooking Time & Tips For Lily of the Valley Decorated Sugar Cookies
Creating Lily of the Valley Decorated Sugar Cookies can range from a quick assembly to a slow, leisurely process, depending on your schedule and passion for detail. If you’re short on time, you can use ready-made royal icing and pre-cut cookie dough to speed things up. However, if you’re looking to dive deeper into the craft of baking, take your time to mix the dough, roll it out, and decorate each cookie, allowing you to savor the whole experience.
For success, make sure all ingredients are at room temperature, especially the butter. When mixing the wet ingredients, incorporate the sugar slowly to ensure a light texture. Additionally, keep the dough chilled before rolling, as this prevents it from becoming too sticky and ensures cleaner cuts with your cookie cutters. Flour your surface generously and don’t rush the baking time. The goal is lightly golden edges for that perfect crunchy bite!
Step-by-Step Directions
Preheat your oven to 350°F (175°C) and line your baking sheets with parchment paper. This preparation creates a non-stick surface that promotes even baking and easy cleanup.
In a medium bowl, whisk together the flour, baking soda, baking powder, and salt. This vital step ensures that the leavening agents are evenly distributed throughout the flour, leading to perfectly risen cookies.
In a large bowl, cream the softened butter and sugar together until light and fluffy. You want this step to be airy, as the incorporation of air in this mixture contributes to the lift of the cookies.
Now add the egg, vanilla extract, and almond extract to the butter-sugar mix and beat until smooth and well blended. The aroma of the extracts will begin to perfume the air.
Gradually add the dry ingredients to the wet mixture, mixing just until everything is combined. You don’t want to overmix but incorporate just enough for a cohesive dough.
If the dough seems stiff, gently add milk, one tablespoon at a time, until the dough holds together nicely without becoming too sticky.
Sprinkle flour on your work surface, roll out the dough to about 1/4 inch thick, and feel the soft texture under your rolling pin, a joy in itself.
Cut out the cookies into desired shapes, like ovals or circles, and place them onto the prepared baking sheets. As you do this, envision how beautiful these cookies will look once decorated.
Bake for 8-10 minutes or until the edges are just lightly golden, giving a light crunch to the perfect balance of textures.
Allow them to cool on a wire rack, and while they cool, fantasize about the elegant designs you’ll create with the royal icing.
Once cooled, take white and green royal icing, using a piping bag to decorate the cookies. Use white for the lilies and green for the leaves, adding fine detailing that mimics the real flowers. Allow the icing to set completely before serving or gifting your beautifully crafted cookies.
Serving Suggestions & Occasions
Lily of the Valley Decorated Sugar Cookies make a stunning addition to a variety of occasions. They are perfect for spring celebrations, bridal showers, baby showers, or afternoon tea gatherings. Pair them with a refreshing iced tea or a creamy latte to elevate the experience. Place these cookies on a vibrant platter and watch your guests’ eyes light up as they admire your handiwork. They also make lovely gifts when presented in decorative boxes, showcasing the effort and thoughtfulness behind each handmade treat.
Common Mistakes For Lily of the Valley Decorated Sugar Cookies
While baking can be an enjoyable adventure, there are a few pitfalls to avoid when making these cookies. One common mistake is overworking the dough, which can lead to tough cookies. Be gentle when mixing and rolling. Additionally, neglecting to chill the dough can result in cookies that spread too much during baking. Avoid skimping on the cooling time before decorating—the frosting won’t set properly on warm cookies. Finally, be mindful of the icing consistency; too runny will not maintain the shapes you desire, and too stiff can be challenging to work with. Remember, patience is key, and every mistake is a learning opportunity.
Healthier Alternatives & Variations
Want to make your Lily of the Valley Decorated Sugar Cookies a little lighter? You can substitute half of the all-purpose flour with whole wheat flour to add a little nutritional boost. Additionally, consider using coconut oil or a plant-based butter alternative in place of traditional butter to cater to vegan dietary preferences. To cut down on sugar, try using natural sweeteners like honey or maple syrup, adjusting the wet ingredients accordingly. For variations, experiment with flavors by adding lemon zest for a citrus twist or infusing the dough with different extracts, such as orange or coconut, to create new taste sensations.
FAQs
Can I prepare the dough in advance?
Absolutely! You can prepare the dough a day or two ahead and refrigerate it until you are ready to roll and bake.How can I store leftover cookies?
Store decorated sugar cookies in airtight containers at room temperature for up to a week, or freeze them for longer-lasting freshness.Why are my cookies spreading too much?
This can often occur if the dough is too warm or if the butter was melted instead of softened. Remember to chill your dough if it’s too warm before cutting.How do I achieve the perfect icing consistency?
Aim for a flowy yet thick consistency for detailed designs. For outline work, you’ll want a thicker icing, while for flooding, it should be more fluid.Can I substitute the extracts?
Yes! Different extracts like lemon, orange, or even peppermint can infuse a beautiful new flavor into your cookies.How long should I let the icing dry?
Allow the icing to dry completely—usually several hours or overnight—for best presentation before serving or stacking.
Conclusion
There’s something profoundly satisfying about creating your own delectable Lily of the Valley Decorated Sugar Cookies. They are not just pretty treats; they encapsulate skill, care, and the joys of baking that can bring friends and family together. As you plan your next baking day, let this recipe guide you toward an experience filled with creativity, flavor, and, most importantly, joy. The gentle scent of vanilla and almond wafting through your kitchen will draw everyone in, each eager to taste your beautiful creations. Don’t wait—dive into this delightful recipe and surprise your loved ones with your artistic cookie decorating skills!
Lily of the Valley Decorated Sugar Cookies
Ingredients
Cookie Dough Ingredients
- 2 3/4 cups all-purpose flour Creates a tender base for the cookies.
- 1 teaspoon baking soda Ensures a light and airy texture.
- 1/2 teaspoon baking powder Key for achieving perfect rise and fluffiness.
- 1 cup unsalted butter, softened Contributes a luxurious texture and flavor.
- 1 1/2 cups sugar Adds sweetness and crisp edge.
- 1 large egg Binds ingredients together.
- 1 teaspoon vanilla extract Enhances sweetness with warmth.
- 1 teaspoon almond extract Adds appealing nutty undertones.
- 1/2 teaspoon salt Enhances the flavors.
- 2-3 tablespoons milk Adjusts dough consistency.
Decorating Ingredients
- as needed white and green royal icing Transforms cookies into eye-catching designs.
Instructions
Preparation
- Preheat your oven to 350°F (175°C) and line your baking sheets with parchment paper.
- In a medium bowl, whisk together the flour, baking soda, baking powder, and salt.
- In a large bowl, cream the softened butter and sugar together until light and fluffy.
- Add the egg, vanilla extract, and almond extract to the butter-sugar mix and beat until smooth.
- Gradually add the dry ingredients to the wet mixture, mixing just until combined.
- If the dough seems stiff, add milk, one tablespoon at a time, until the dough holds together.
- Sprinkle flour on your work surface, roll out the dough to about 1/4 inch thick.
- Cut out the cookies into desired shapes and place them onto the prepared baking sheets.
Baking
- Bake for 8-10 minutes or until the edges are lightly golden.
- Allow the cookies to cool on a wire rack.
Decorating
- Once cooled, use a piping bag to decorate the cookies with white and green royal icing.
- Allow the icing to set completely before serving or gifting.