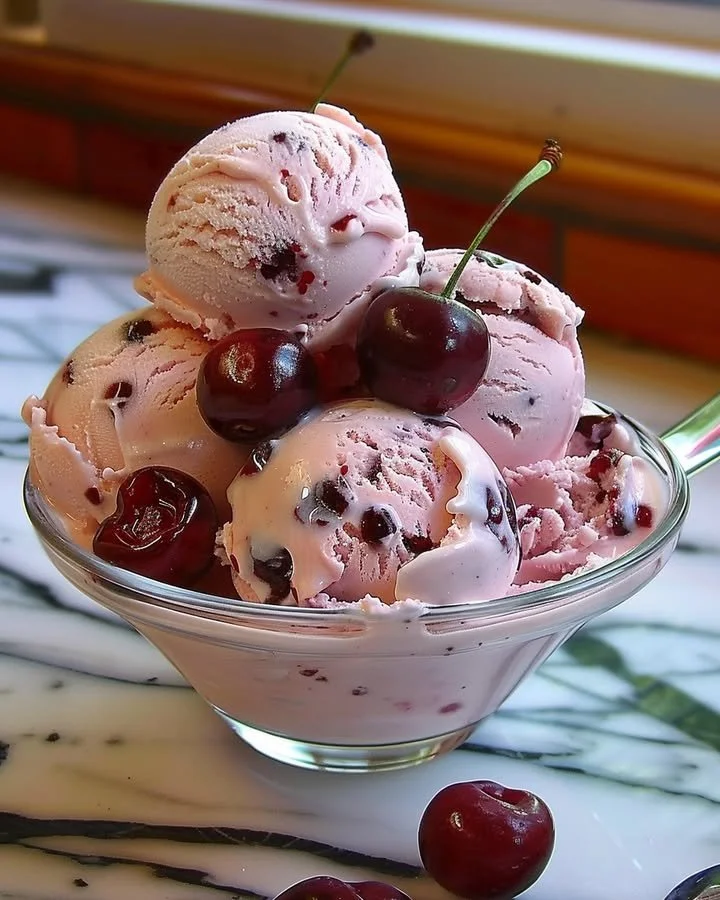
Homemade Cherry Ice Cream
Imagine a warm summer day, where the sun rays gently embrace your skin, and the air is filled with sweet aromas of fresh fruits mingling with a hint of creaminess. As you take a spoonful of Homemade Cherry Ice Cream, the rich and luscious flavors burst onto your palate, whisking you away to a blissful state of happiness. This recipe not only entices your taste buds but also fills your heart with joy. In this step-by-step guide, you’ll learn how to make this decadent treat that not only cools you down but also reminds you of childhood summers spent under the shade of a tree, enjoying simple pleasures.
History / Fun Fact
Ice cream has been enjoyed for centuries, tracing back to ancient civilizations that mixed snow or ice with fruit and flavorings. However, cherries have a unique story that complements this delightful dessert. Originating from the early communities in Asia Minor, cherries were eventually cultivated throughout Europe and North America. Their bright hue and sweet-tart flavor profile make them a favorite for not just desserts but also for preserving in jams and sauces. Combining cherries into ice cream bridges the gap between traditional frozen treats and the natural sweetness of fruits, creating a timeless dessert perfect for any gathering.
Ingredients
To create your homemade cherry ice cream, you will need:
2 cups cherries, pitted and halved – Juicy and vibrant, these cherries not only add a pop of color but their sweet and tart notes are simply irresistible.
1 cup heavy cream – This rich and velvety cream elevates the ice cream to luscious heights, creating a dreamy texture.
1 cup whole milk – Creamy yet light, whole milk balances the richness of the heavy cream while contributing to a smooth and satisfying mouthfeel.
3/4 cup granulated sugar – This sweetener captures the essence of summer, enhancing the flavors of the cherries and lending a delightful sweetness.
1 teaspoon vanilla extract – A fragrant elixir that rounds out the flavors and offers a warm, inviting aroma.
Pinch of salt – This simple touch enhances the sweetness and depth, bringing all the components together harmoniously.
Cooking Time & Tips For Homemade Cherry Ice Cream
When it comes to making homemade cherry ice cream, you have the option of choosing between a quick and a slow preparation method. The quick route involves preparing the ice cream mixture in under an hour by using an ice cream maker. In contrast, the slow preparation allows the flavors to infuse and develop more deeply, making for an even richer experience.
Practical tips for success include using ripe cherries for optimal sweetness and freshness. If you don’t have cherries available, consider using other fruits like strawberries or peaches. Pay attention to the churning process—properly churning the mixture is key for achieving that perfect soft-serve consistency before freezing. Lastly, don’t forget to leave your ice cream in the freezer for at least four hours to allow it to firm up nicely.
Step-by-Step Directions
Start by tossing the pitted and halved cherries into a medium bowl with 1/4 cup of sugar. Allow them to sit for about 30 minutes to macerate. During this time, the sugar draws out the juices, intensifying the cherries’ natural sweetness and flavor. You’ll see the juices beginning to pool, a beautiful ruby color that hints at the deliciousness to come!
In a separate bowl, whisk together the heavy cream, whole milk, the remaining sugar, vanilla extract, and a pinch of salt until the sugar is fully dissolved. The cream will become frothy, and the vanilla will leave a beautiful fragrance wafting through the kitchen.
Once your cherry mixture is ready, fold it gently into the cream mixture, ensuring you scoop up all those gorgeous juice-laden cherries. Stir until it’s fully combined, a beautiful marbled effect is what you are after, showcasing those vibrant cherry pieces.
Now it’s time to churn! Pour this delightful mixture into your ice cream maker and churn according to the manufacturer’s instructions. This process airates the mixture, turning it into a soft-serve consistency that is both creamy and smooth—you can feel the excitement building!
Transfer your luscious ice cream into a lidded container and pop it in the freezer for at least 4 hours or until it’s firm enough to scoop. That’s the hardest part, waiting patiently while the flavors meld together into a frozen dream.
When it’s time to serve up your homemade cherry ice cream, scoop it into a bowl or cone, and let the sweet, creamy goodness transport you back to those carefree summer days. Each bite is a celebration that you’ll want to share with loved ones.
Serving Suggestions & Occasions
Homemade cherry ice cream beckons for special occasions like birthday celebrations, summer barbecues, or cozy evenings on the porch. Serve it in a crisp waffle cone, topped with a sprinkle of chopped almonds or dark chocolate shavings for an extra touch of indulgence. It works beautifully alongside berry cobbler, or as the perfect companion to a slice of rich chocolate cake. Pair it with fresh mint leaves as a garnish for an aesthetically pleasing and refreshing touch.
Common Mistakes For Homemade Cherry Ice Cream
One common mistake is not macerating the cherries long enough. Allowing them to sit with sugar helps bring out their natural sweetness and flavors; don’t skip this important step! Another error is over-churning the ice cream, which can lead to a grainy texture rather than the smooth, creamy consistency desired. Lastly, not allowing enough time for freezing can result in a soft ice cream that is difficult to scoop. Patience is key; let it chill and firm up properly!
Healthier Alternatives & Variations
If you’re looking for healthier alternatives, consider using coconut cream in place of heavy cream for a lighter option. You can also reduce the sugar by using a sugar substitute or opt for natural sweeteners, such as honey or maple syrup. For a fun twist, consider experimenting with other fruit combinations; blueberries, strawberries, or peaches can maintain that fruit-forward essence while offering unique flavor profiles. For a richer dessert, swirl in some dark chocolate or mix in little pieces of cookie dough for added texture.
FAQs
Can I make this cherry ice cream without an ice cream maker?
Absolutely! You can mix the ingredients and place them in a freezer-safe container. Whisk everything together every hour for a few hours until it achieves the desired texture.How long will homemade cherry ice cream last in the freezer?
When stored properly in an airtight container, your cherry ice cream can last for about 2-3 weeks.Can I substitute frozen cherries for fresh ones?
Yes, you can use frozen cherries. Just be sure to thaw them and pat them dry before using to avoid excess water content.Is it possible to make cherry ice cream vegan?
Yes! You can substitute heavy cream with coconut cream or other plant-based heavy creams, sugar with maple syrup, and use almond milk instead of whole milk.How do I know when my ice cream is the right consistency?
When your ice cream reaches a soft-serve texture during the churning process and firms up enough to scoop after freezing, it’s ready to enjoy!Can I mix in other ingredients like nuts or chocolate?
Certainly! Feel free to get creative by adding chopped nuts, chocolate chips, or other fruits during the last few minutes of churning.
Conclusion
Now that you have the secrets to crafting your very own homemade cherry ice cream, it’s time to dive into this delicious adventure. The symphony of vibrant cherry flavors, creamy sweetness, and the joy of making something from scratch beckons you to try it immediately. So gather your ingredients and let the fun begin! Your kitchen awaits the delightful chaos of laughter, mixing, and celebrating the joys of homemade ice cream. Each scoop tells a story, and it’s one you won’t want to miss!

Homemade Cherry Ice Cream
Ingredients
For the Cherry Mixture
- 2 cups cherries, pitted and halved Juicy and vibrant cherries for flavor.
- 3/4 cup granulated sugar Sweetener that enhances cherry flavor.
For the Ice Cream Base
- 1 cup heavy cream Rich cream for a luscious texture.
- 1 cup whole milk Balances the richness of heavy cream.
- 1 teaspoon vanilla extract Adds warmth and aroma.
- pinch salt Enhances sweetness and flavor.
Instructions
Preparation
- Toss the pitted and halved cherries into a medium bowl with 1/4 cup of sugar. Allow them to sit for about 30 minutes to macerate.
- In a separate bowl, whisk together the heavy cream, whole milk, the remaining sugar, vanilla extract, and a pinch of salt until the sugar is fully dissolved.
- Fold the cherry mixture gently into the cream mixture, stirring until fully combined.
Churning and Freezing
- Pour the mixture into your ice cream maker and churn according to the manufacturer's instructions.
- Transfer the ice cream into a lidded container and freeze for at least 4 hours or until firm.
Serving
- Scoop the ice cream into bowls or cones and enjoy.