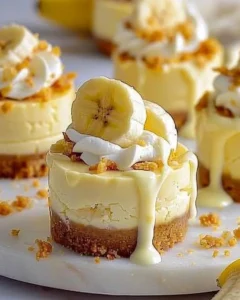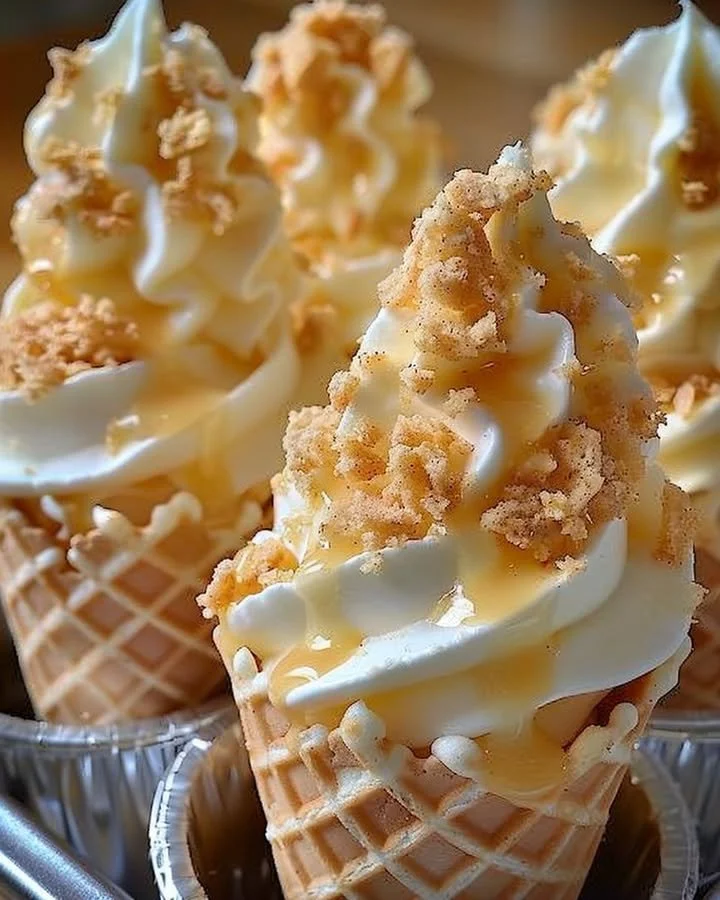
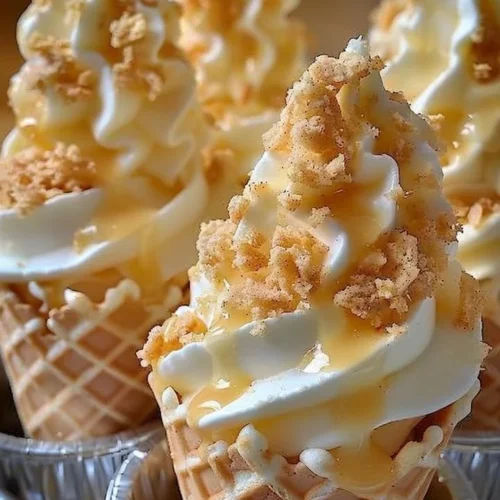
Banana Pudding Cheesecake Cones
Banana Pudding Cheesecake Cones are a delightful twist on the classic dessert that you just won’t be able to resist. Imagine biting into a crisp waffle cone filled with a creamy, dreamy concoction of luscious banana cream cheesecake. The combination of flavors, textures, and the eye-catching presentation makes these cones not only a treat for the taste buds but also a feast for the eyes.
This dessert is perfect for warm days or gatherings, and the step-by-step recipe ensures that you can whip them up without any fuss. They’re fun to make and even more fun to share, making them a necessity for your dessert table.
Why You’ll Love This Recipe
The Banana Pudding Cheesecake Cones come with a multitude of benefits. They’re incredibly easy to prepare, making them an excellent option for both novice and seasoned bakers alike. With minimal ingredients and quick assembly, you can have a stunning dessert in no time. They are also family-friendly, providing a sweet option that everyone can enjoy, from kids to adults.
Because they are served in individual cones, these delightful desserts are perfect for parties, picnics, or any casual gathering. Plus, the nostalgic flavors of banana pudding combined with cheesecake create an irresistible treat that will leave your guests asking for more.
Ingredients for Banana Pudding Cheesecake Cones
Gathering ingredients for your Banana Pudding Cheesecake Cones is both simple and exciting. Here’s what you’ll need:
- 6 waffle cones: Sweet and crunchy, these cones serve as the perfect vessel for your creamy filling.
- 1 (8 oz) block cream cheese, softened: This rich and smooth cream cheese forms the base of your cheesecake filling, creating a luscious texture.
- 1/2 cup sweetened condensed milk: This adds a silky sweetness that balances the tang of the cream cheese effortlessly.
- 1 (3.4 oz) box instant banana cream pudding mix: For that unmistakable banana flavor—it’s a game changer!
- 1 1⁄2 cups cold milk: Used to mix with the pudding for a creamy consistency.
- 1 tsp vanilla extract: It enhances the flavors for a warm, aromatic touch.
- 1 cup whipped topping (like Cool Whip): To create a fluffy, light texture in your filling.
- 1/2 cup crushed vanilla wafers: Adding crunch and classic banana pudding flavor.
- 1 large banana, sliced: Fresh banana adds a wonderful burst of flavor and moisture.
- Extra whipped topping & wafers for garnish: For an aesthetic touch and added deliciousness.
Step-by-Step Directions for Banana Pudding Cheesecake Cones
In a large mixing bowl, beat the softened cream cheese using an electric mixer until it becomes smooth and creamy. The process should take about 2 minutes.
To this, add the sweetened condensed milk, the instant banana cream pudding mix, the cold milk, and the vanilla extract. Mix thoroughly until the mixture is thick and well combined, creating a velvety smooth texture.
Gently fold in the whipped topping, being careful not to deflate the mixture, until it’s light and fluffy.
Start assembling your cones! Layer the bottom of each waffle cone with crushed vanilla wafers to create a stable base.
Using a spoon, fill the cone with a generous dollop of the cheesecake filling, then add a slice or two of banana.
Repeat the layers until your cones are filled to the top, showcasing the beautiful colors and textures.
Finish off with a swirl of extra whipped topping, a sprinkle of crushed vanilla wafers, and a slice of banana or additional wafer for garnish.
Chill the assembled cones upright for about 30 minutes before serving. This ensures the filling sets beautifully, making them easier to eat.
Tips & Tricks
To elevate your Banana Pudding Cheesecake Cones, consider chilling your waffle cones in the freezer before filling. This not only keeps the cones crisp but also adds an enjoyable chill to your dessert.
For added fun, feel free to mix in mini chocolate chips or nuts to the filling for a delightful surprise. If you want an extra layer of flavor, you can drizzle some chocolate syrup inside the cones before filling them, infusing a luxurious taste.
Lastly, if you’re short on time, ready-made pudding can be a quick substitute for homemade; just ensure it’s banana-flavored to keep the essence of this dish intact.
Serving Suggestions & Pairings
These delectable cones are perfect for a sunny afternoon picnic or a summer barbecue. Serve them as individual desserts—they’re just the right size for a tempting treat without going overboard.
Pair them up with a refreshing glass of iced tea or lemonade for an ideal dessert experience. For a more indulgent pairing, consider serving them alongside a scoop of vanilla ice cream. The combined textures and temperatures will create an unforgettable summer dessert.
Nutritional Information
Indulging in Banana Pudding Cheesecake Cones offers a delightful balance of sweetness and creaminess, but it’s important to know what you’re indulging in. Each cone packs roughly 280 calories, with a mix of carbs, fats, and a decent serving of sugar.
While they’re definitely a treat, you can enjoy every creamy bite knowing that these cones are a perfect way to satisfy your sweet tooth without overdoing it. Enjoy them as an occasional indulgence for special events or parties!
Storing Tips & Variations for Banana Pudding Cheesecake Cones
If you find yourself with leftover cones, store them in the fridge for up to two days. If the cones start to become soggy, consider separating the filling and the cones to keep both fresh longer until you are ready to serve.
For healthier variations, you can swap out the cream cheese for Greek yogurt or opt for a low-fat whipped topping. Additionally, try using crushed graham crackers in place of vanilla wafers for a slightly different taste and texture.
Conclusion for Banana Pudding Cheesecake Cones
If you’re looking for a fresh, fun, and fittingly delicious dessert, you absolutely must try Banana Pudding Cheesecake Cones! They blend the classic flavors of banana pudding and cheesecake into an adorable and easy-to-eat treat. Perfect for warm gatherings or simply a sweet indulgence at home, you won’t regret diving into these creamy delights. Try making them today and treat yourself and your loved ones to a scrumptious surprise!
FAQs
Can I use other fruits in these cones?
Yes! Feel free to substitute or mix in your favorite fruits such as strawberries or blueberries for a delicious twist.Can I make these cones ahead of time?
Absolutely! You can prepare the filling a day in advance and fill the cones just before serving to maintain their crispiness.What if I can’t find waffle cones?
If you can’t find waffle cones, you can use any ice cream cone or even small dessert cups—just adjust the layering accordingly.Is there a vegan alternative for this recipe?
Yes! You can use dairy-free cream cheese and coconut whipped cream to create a vegan version of these delightful cones.How do I ensure the filling doesn’t make the cones soggy?
To prevent soggy cones, layer the crushed wafers at the bottom of each cone and serve them shortly after filling.
Banana Pudding Cheesecake Cones
Ingredients
For the cones
- 6 pieces waffle cones Sweet and crunchy cones for serving.
For the filling
- 1 8 oz block cream cheese, softened Rich cream cheese forms the base.
- 1/2 cup sweetened condensed milk Adds silkiness to the filling.
- 1 3.4 oz box instant banana cream pudding mix For banana flavor.
- 1 1/2 cups cold milk Mixed with pudding for consistency.
- 1 tsp vanilla extract Enhances flavors.
- 1 cup whipped topping (like Cool Whip) Creates a light texture.
- 1/2 cup crushed vanilla wafers Adds crunch and flavor.
- 1 large banana, sliced For freshness and flavor.
- as needed Extra whipped topping & wafers for garnish For aesthetic and taste.
Instructions
Preparation
- In a large mixing bowl, beat the softened cream cheese using an electric mixer until it becomes smooth and creamy. This should take about 2 minutes.
- Add the sweetened condensed milk, instant banana cream pudding mix, cold milk, and vanilla extract. Mix until thick and well combined.
- Gently fold in the whipped topping until light and fluffy.
Assembly
- Layer the bottom of each waffle cone with crushed vanilla wafers.
- Fill the cone with a generous dollop of the cheesecake filling and add a slice or two of banana.
- Repeat the layers until the cones are filled to the top.
- Top with extra whipped topping, a sprinkle of crushed wafers, and a slice of banana or wafer for garnish.
Chill
- Chill the assembled cones upright for about 30 minutes before serving.