Gingerbread Cookies with Winter Forest Design are the perfect festive treat to warm your heart and home during the chilly winter months. These cookies are not only a delight to the taste buds with their aromatic blend of spices, but they also provide a fun, creative outlet in the kitchen. Picture the sweet scent of molasses and spices wafting through your home as you bake, and the joy of decorating each cookie with intricate designs reminiscent of a magical winter wonderland. This recipe is truly a comforting, family-friendly project that will leave you with delicious memories.
Why You’ll Love This Recipe
This Gingerbread Cookies with Winter Forest Design recipe offers countless reasons to fall in love. First, it requires simple ingredients that are likely already in your pantry, making for easy prep. Second, this recipe seamlessly combines baking and artistic expression, engaging children and adults alike in the fun of cookie decorating. Its minimalist ingredient list keeps things uncomplicated, while the step-by-step instructions make it accessible for both novice bakers and seasoned pros. Not only do these cookies taste fantastic, but they also serve as a wonderful centerpiece for holiday gatherings or as delightful gifts.
Ingredients
To start your Gingerbread Cookies with Winter Forest Design adventure, gather the following ingredients:
- 3 1/4 cups all-purpose flour, an essential foundation that gives the cookies a soft yet sturdy structure.
- 3/4 teaspoon baking soda, the magic leavening agent that helps the cookies rise perfectly.
- 1 tablespoon ground ginger, a warm spice that adds a signature zing.
- 1 tablespoon ground cinnamon, for that comforting and festive flavor.
- 1/4 teaspoon ground cloves, which lends depth and warmth.
- 1/4 teaspoon nutmeg, another warm spice to create a cozy aroma.
- 1/2 teaspoon salt, balancing the sweetness beautifully.
- 1/2 cup unsalted butter, softened, ensuring a creamy and rich cookie texture.
- 1/2 cup packed brown sugar, providing sweetness and a hint of molasses flavor.
- 1 large egg, binding the ingredients together seamlessly.
- 2/3 cup unsulfured molasses, adding that signature dark sweetness essential to gingerbread.
- 1 teaspoon pure vanilla extract, for a touch of aromatic sweetness.
- 3 cups powdered sugar, the base for the royal icing that creates beautiful decorations.
- 2 large egg whites or 3 tablespoons meringue powder mixed with 6 tablespoons water, essential for the royal icing.
- 1/2 teaspoon vanilla or almond extract, adding an extra layer of flavor.
- Gel food coloring (green, white, brown, and optional blue) to bring your winter forest designs to life.
- Edible gold dust (optional for the deer), for that extra sparkle.
- Fine sugar or edible glitter for a magical snow effect, making your cookies truly enchanting.
Step-by-Step Directions
Begin by whisking together the all-purpose flour, baking soda, ground ginger, cinnamon, cloves, nutmeg, and salt in a medium bowl. Set aside your aromatic blend of dry ingredients.
In a separate large bowl, cream the softened butter and brown sugar together until the mixture is light and fluffy. This step creates a rich base for your cookies. Add the egg, molasses, and vanilla extract, mixing until everything is well incorporated and smooth.
Gradually, incorporate the dry ingredients into the wet mixture, stirring until a cohesive dough forms. If the dough feels too sticky, don’t hesitate to add a little more flour until it reaches a workable consistency.
Divide the dough into two equal portions; wrap each portion tightly in plastic wrap. Chill in the fridge for at least one hour to firm up the dough for easier rolling.
Preheat your oven to 350°F (175°C) and line baking sheets with parchment paper in preparation for your delicious creations.
Lightly flour a clean surface and roll out one portion of the chilled dough, achieving a thickness of about 1/4 inch. Use cookie cutters to cut out various shapes—think of trees, deer, and snowflakes to fit your winter forest theme.
Carefully place the cookie cutouts on the lined baking sheets, ensuring they are not too close together. Bake for 8-10 minutes until the edges are lightly golden and fragrant.
Allow the cookies to cool on the baking sheets for a few minutes before transferring them to a wire rack to cool completely, which will ensure they become crisp yet tender.
Prepare the royal icing by beating the egg whites (or the meringue powder mixture) in a mixing bowl until stiff peaks form. Gradually add powdered sugar and the vanilla extract, continuing to beat until the icing is smooth and firm. This icing is what will bring your winter designs to life!
Divide the prepared icing into bowls, adding gel food coloring based on your desired winter forest colors—green for trees, brown for deer, white for snow, and optional blue for a frosty touch.
Load piping bags fitted with small tips with the colored royal icing. Pipe intricate winter forest designs onto your cooled cookies. Think carefully about details—trees, deer, snowflakes, and a sprinkle of snow effects.
For a special touch, add edible gold dust to the deer cookies, and dust fine sugar or edible glitter on others for a stunning snow effect. A small brush can help perfect these details.
Once decorated, allow the royal icing to dry completely before serving or packaging your delightful creations.
Tips & Tricks
Enhance your Gingerbread Cookies with Winter Forest Design by trying a few extra tips. For a richer flavor, consider letting your dough rest overnight in the fridge—this will intensify the taste. When rolling out your dough, sprinkle flour on the surface to prevent sticking, but be careful not to add too much, as it could alter the texture. If the icing is too thick, add a few drops of water to soften it for easier piping. Alternatively, if it’s too runny, add more powdered sugar to achieve the perfect consistency. Don’t hesitate to get creative with your designs—add other edible decorations like small candy pieces or chocolate chips to introduce even more charm to your cookies!
Serving Suggestions & Pairings
These Gingerbread Cookies with Winter Forest Design are perfect for various occasions. Serve them at holiday parties, give them as personalized gifts, or use them to decorate your dessert table during festive gatherings. Pair them with warm beverages like hot cocoa, spiced cider, or a classic cup of tea to elevate your enjoyment. They also make for a charming centerpiece on your holiday table or a delightful treat for cookie exchanges and gatherings.
Nutritional Information
The nutritional breakdown for each Gingerbread Cookie (approximately 2-inch size) is about 100 calories, 4g of fat, 15g of carbohydrates, and less than 1g of protein. These cookies offer a nice balance between indulgence and happiness, so enjoy your treats in moderation!
Storing Tips & Variations
Store your decorated Gingerbread Cookies in an airtight container at room temperature for up to a week. If you prefer to freeze them, make sure to freeze the undecorated cookies for optimal freshness. Layer the cookies with parchment paper in an airtight container for protection, and they can last for up to three months in the freezer. When you’re ready to enjoy them, thaw at room temperature and decorate as desired. For variations, try adding different spices or citrus zest to the cookie dough, or experimenting with alternative flours, such as whole wheat or gluten-free versions.
Conclusion
Embrace the spirit of the season by trying out this delightful Gingerbread Cookies with Winter Forest Design recipe. The combination of warm spices, the joy of decorating, and the chance to create beautiful memories with loved ones makes this a cherished activity. Don’t hesitate to share your experiences, stories, and even photos of your delightful gingerbread creations. Happy baking!
FAQs
Can I make these cookies ahead of time?
Absolutely! You can prepare the cookie dough and chill it up to a week in advance. Just make sure to keep it tightly wrapped in the fridge.Can I use store-bought icing instead of homemade royal icing?
Yes, if you’re short on time, you can purchase ready-made icing, but homemade icing tends to set better and allows for finer detail work.How long do these cookies last?
When stored properly in an airtight container, these cookies can last up to a week at room temperature or up to three months in the freezer.Can I substitute the molasses in this recipe?
You can use honey or maple syrup as alternatives, but it might change the flavor slightly. Molasses gives that classic gingerbread taste.Are these cookies suitable for dietary restrictions?
These cookies can be easily modified to be dairy-free or vegan, just substitute butter with a dairy-free version, and use flax eggs or similar replacements to make them vegan-friendly.
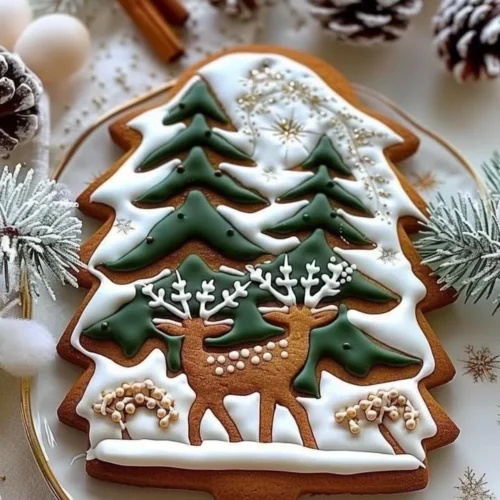
Gingerbread Cookies with Winter Forest Design
Ingredients
For the Gingerbread Cookies
- 3.25 cups all-purpose flour Essential foundation for the cookies.
- 0.75 teaspoon baking soda Leavening agent that helps the cookies rise.
- 1 tablespoon ground ginger Adds a warm spice zing.
- 1 tablespoon ground cinnamon Provides comforting and festive flavor.
- 0.25 teaspoon ground cloves Lends depth and warmth.
- 0.25 teaspoon nutmeg Creates a cozy aroma.
- 0.5 teaspoon salt Balances the sweetness.
- 0.5 cup unsalted butter, softened Ensures a creamy, rich cookie texture.
- 0.5 cup packed brown sugar Provides sweetness and a hint of molasses flavor.
- 1 large egg Binds the ingredients together.
- 2/3 cup unsulfured molasses Essential for gingerbread's signature dark sweetness.
- 1 teaspoon pure vanilla extract Adds aromatic sweetness.
For the Royal Icing
- 3 cups powdered sugar Base for royal icing.
- 2 large egg whites Essential for royal icing, or substitute with meringue powder.
- 0.5 teaspoon vanilla or almond extract For extra flavor.
For Decoration
- as needed Gel food coloring (green, white, brown, optional blue) For winter forest designs.
- as needed Edible gold dust (optional) For extra sparkle on deer cookies.
- as needed Fine sugar or edible glitter For a magical snow effect.
Instructions
Prepare the Dough
- Whisk together the flour, baking soda, ginger, cinnamon, cloves, nutmeg, and salt in a medium bowl. Set aside.
- In a large bowl, cream the butter and brown sugar until light and fluffy. Add the egg, molasses, and vanilla, mixing until smooth.
- Gradually add the dry ingredients into the wet mixture, stirring until cohesive. If needed, add more flour for a workable dough.
- Divide the dough into two portions, wrap in plastic, and refrigerate for at least one hour.
Bake the Cookies
- Preheat the oven to 350°F (175°C) and prepare baking sheets with parchment paper.
- Flour a clean surface and roll out one portion of dough to 1/4 inch thickness. Cut out shapes using cookie cutters.
- Place cutouts on baking sheets, ensuring space between them. Bake for 8-10 minutes until lightly golden.
- Allow cookies to cool briefly on sheets before transferring to a wire rack to cool completely.
Prepare Royal Icing
- Beat egg whites in a mixing bowl until stiff peaks form. Gradually add powdered sugar and vanilla, beating until smooth.
- Divide icing into bowls, adding gel food coloring as desired.
Decorate the Cookies
- Load piping bags with colored icing and pipe intricate designs onto cooled cookies.
- Add edible gold dust and fine sugar or glitter for decorative effects.
- Allow the icing to dry completely before serving or packaging.