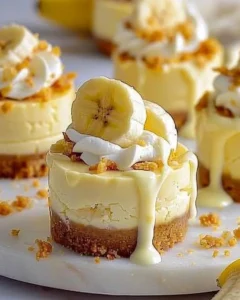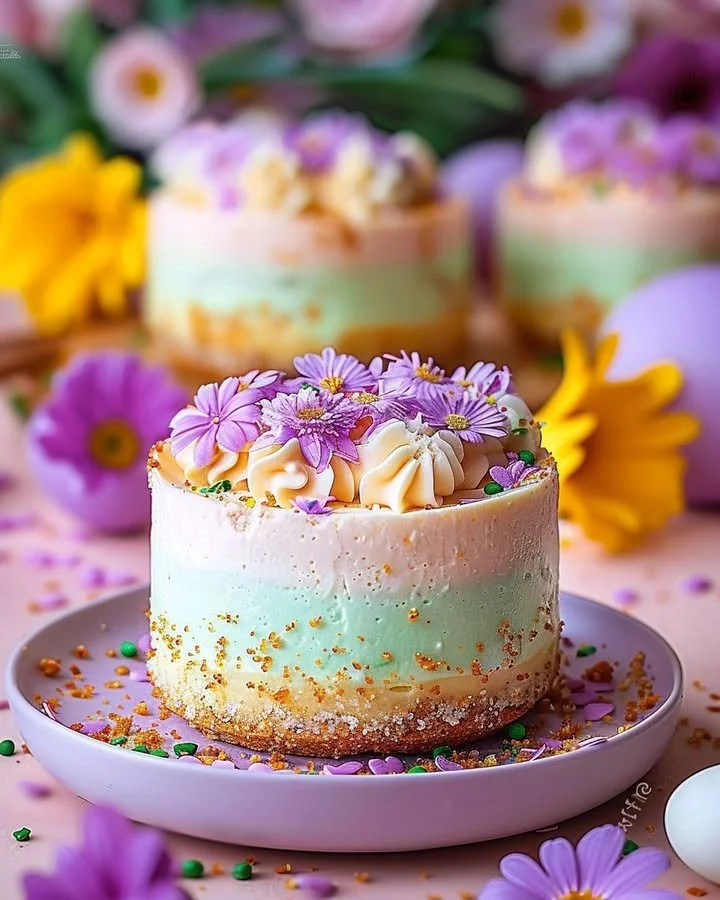
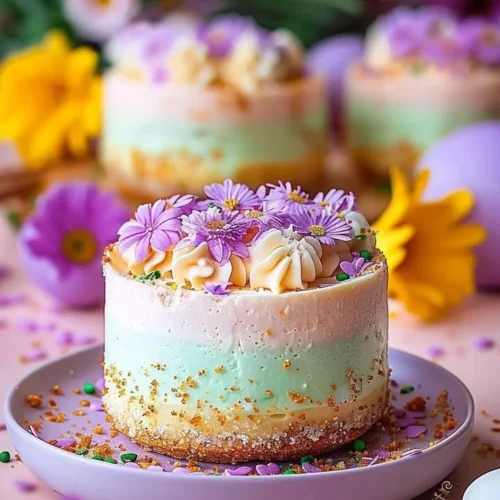
Easter No-Bake Mini Cheesecakes
There’s something magical about the arrival of spring, especially when it involves thought of Easter celebrations. This Easter No-Bake Mini Cheesecakes recipe is the epitome of delightful indulgence, perfectly crafted to bring smiles and satisfaction to your table. Imagine the silky cream cheese filling meeting the buttery, crumbly crust, creating a harmony of flavors that’s both rich and refreshing. Each bite promises to evoke the joyous feelings of spring with the vibrant pastel colors that mimic blooming flowers, complementing the sweet essence of your favorite Easter candies. This step-by-step recipe is here to guide you in creating these heavenly mini cheesecakes that will leave your guests begging for the recipe!
History / Fun Fact
No-bake cheesecakes have a compelling backstory that adds to their charm. Originating from the classic cheesecake, which dates back to ancient Greece, the no-bake variation became popular in America during the 20th century. This adaptation allows for a lighter, less time-consuming dessert, making it a go-to for festive occasions, particularly Easter. The simplicity of the no-bake method emphasizes the joy of family gatherings—perfect for bustling kitchens filled with laughter and love. The addition of festive themes, such as Easter, turns this already delightful dessert into a perfect centerpiece for holiday celebrations, capturing the essence of springtime happiness.
Ingredients
The success of your Easter No-Bake Mini Cheesecakes lies in high-quality ingredients that inspire flavor and texture.
- 1 cup graham cracker crumbs: These provide a crunchy, buttery base that cradles the creamy topping.
- 3 tbsp unsalted butter (melted): This adds richness and binds the crust together.
- 2 tbsp sugar (optional): A subtle sweetness enhancing the crust’s flavor.
- 8 oz cream cheese (softened): Creamy, tangy perfection that forms the heart of your cheesecake filling.
- 1/2 cup powdered sugar: This sweetens the filling while maintaining its smooth texture.
- 1 tsp vanilla extract: Infuses the filling with warmth and depth.
- 1 cup heavy whipping cream (cold): Whipped cream transforms the filling into a light, airy delight.
- Pastel food coloring (pink, yellow, green, purple – optional): Adds visual charm reminiscent of Easter eggs.
- Easter candies (mini eggs, jelly beans, or chocolate bunnies): These bring playful decoration and bursts of sweetness.
- Whipped cream (optional for topping): For that extra touch of indulgence.
Cooking Time & Tips For Easter No-Bake Mini Cheesecakes
Preparing these delightful mini cheesecakes can be a quick endeavor but can also provide the joy of a leisurely cooking experience. Quick preparation involves gathering all your ingredients and efficiently working through the steps, ideal for last-minute gatherings. Conversely, taking your time allows you to savor the process—mixing, tasting, and perhaps experimenting with colors or decorations.
For a successful outcome, ensure your cream cheese is at room temperature for easy blending. A cold bowl for whipping cream helps achieve those stiff peaks quickly. Don’t rush the chilling—allow sufficient time for the cheesecakes to set properly, avoiding the disappointment of a runny dessert.
Step-by-Step Directions
Prepare the Crust: Begin by gathering a mixing bowl and combining the graham cracker crumbs, melted butter, and optional sugar. The mixture should feel like wet sand. Line your muffin tin with paper liners and evenly press approximately one tablespoon of this crumb mixture into the base of each liner. Firmly pack it down and pop the muffin tin in the refrigerator while you work on the filling—it’s essential for developing the right texture!
Make the Cheesecake Filling: In a large mixing bowl, use a hand mixer to beat the softened cream cheese, powdered sugar, and vanilla extract until the mixture is smooth and free of lumps. In another large bowl, whip the cold heavy cream until stiff peaks form. This creates the airy texture! Gently fold the whipped cream into the cream cheese mixture, trying to keep as much air in the batter as possible for that light and fluffy cheesecake texture.
Add Colors (Optional): If you want to brighten things up, take 3-4 small bowls and divide your cheesecake filling among them. Add a few drops of your chosen pastel food colors to each bowl and gently mix until you have a cheerful array of colors.
Assemble the Mini Cheesecakes: Carefully spoon the colored cheesecake fillings over the chilled crusts. Feel free to create layers with the colors, but be sure to smooth the tops as you go—this adds to the final presentation.
Chill and Decorate: Once assembled, refrigerate the mini cheesecakes for a minimum of 2-3 hours, allowing them to set completely. Before serving, let your creativity shine—top each cheesecake with an assortment of Easter candies, and if you’re feeling decadent, a swirl of whipped cream.
Serving Suggestions & Occasions
These Easter No-Bake Mini Cheesecakes are perfect for a variety of occasions! While they shine brightly at Easter celebrations with family and friends, they also bring joy to bridal showers, birthdays, or any spring-themed gathering. A tray of these colorful delights is sure to catch the eyes of guests, igniting conversations and laughter. Serve them alongside a refreshing fruit salad or a warm cup of herbal tea for a complete experience.
Common Mistakes For Easter No-Bake Mini Cheesecakes
Every recipe has its pitfalls, and the No-Bake Mini Cheesecakes are no different. One common mistake is not allowing the cream cheese to soften properly; this can result in a lumpy filling. Ensure that your heavy cream is cold—room temperature cream won’t whip to the desired stiffness. Also, be mindful not to overmix when combining the whipped cream and cream cheese; this can deflate the airiness crucial for a dreamy texture. Last but not least, be patient with the refrigerating time; not letting them chill long enough can lead to a disappointing presentation when serving!
Healthier Alternatives & Variations
Whether you’re looking for lighter options or simply want to mix things up, there are several alternatives to consider! For a healthier crust, consider using almond flour mixed with a little coconut oil instead of graham cracker crumbs, or even oat flour for a gluten-free option. Instead of heavy cream, use coconut cream whipped up until light for a dairy-free version. Sweeten the cream cheese filling with honey or agave syrup rather than powdered sugar—this can provide a floral note to complement the cheesecake flavor. You could also swap out traditional Easter candies for fresh fruit topping, like strawberries or blueberries, for a fresher taste.
FAQs
Can I make these mini cheesecakes in advance?
Absolutely! These can be prepared a day before your event and stored in the refrigerator.How long do they last in the fridge?
When stored properly in an airtight container, these cheesecakes can last for about 3-5 days.Can I freeze these mini cheesecakes?
Yes, they freeze well for up to a month. Just ensure they are tightly wrapped or stored in a container to prevent freezer burn.Can I use low-fat cream cheese?
Yes, using low-fat cream cheese will still yield tasty results, though the texture may be slightly different.What store-bought alternatives can I use for the crust?
Store-bought graham cracker crust is a quick alternative, but it can’t beat the freshness of a homemade version!What if I don’t have a muffin tin?
You can use small cups or ramekins as an alternative to muffin tins. Adjust the crust and filling quantities accordingly.
Every bite of these Easter No-Bake Mini Cheesecakes captures the essence of spring and festive fun, making them a must-try dessert for your next celebration. Whether you savor them yourself or share them with loved ones, you’re in for an unforgettable treat. So gather your ingredients, embrace your creativity, and let the joy of cooking bring waves of delight into your kitchen. It’s time to whip up some sugary magic!
Easter No-Bake Mini Cheesecakes
Ingredients
For the crust
- 1 cup graham cracker crumbs Provides a crunchy, buttery base.
- 3 tbsp unsalted butter (melted) Adds richness and binds the crust.
- 2 tbsp sugar (optional) Enhances the crust’s flavor.
For the filling
- 8 oz cream cheese (softened) Forms the heart of the cheesecake filling.
- 1/2 cup powdered sugar Sweetens and maintains the filling's smooth texture.
- 1 tsp vanilla extract Adds warmth and depth to the filling.
- 1 cup heavy whipping cream (cold) Whipped to create a light, airy filling.
- Pastel food coloring (pink, yellow, green, purple – optional) Adds visual charm reminiscent of Easter.
For decoration
- Easter candies (mini eggs, jelly beans, or chocolate bunnies) Bring playful decoration and bursts of sweetness.
- Whipped cream (optional for topping) Extra touch of indulgence.
Instructions
Preparation
- Combine the graham cracker crumbs, melted butter, and optional sugar in a mixing bowl until it resembles wet sand.
- Line a muffin tin with paper liners and press approximately one tablespoon of the crumb mixture into each base. Refrigerate while preparing the filling.
Cheesecake Filling
- Beat softened cream cheese, powdered sugar, and vanilla extract until smooth and lump-free.
- In another bowl, whip the cold heavy cream until stiff peaks form.
- Gently fold the whipped cream into the cream cheese mixture for a light and fluffy texture.
Coloring and Assembling
- If desired, divide the cheesecake filling into small bowls and mix in a few drops of pastel food coloring.
- Spoon the colored filling over the chilled crusts, smoothing the tops as you go.
Chilling and Decorating
- Refrigerate the assembled mini cheesecakes for a minimum of 2-3 hours to set.
- Top with an assortment of Easter candies and a swirl of whipped cream if desired before serving.