Snowflake Sugar Cookies
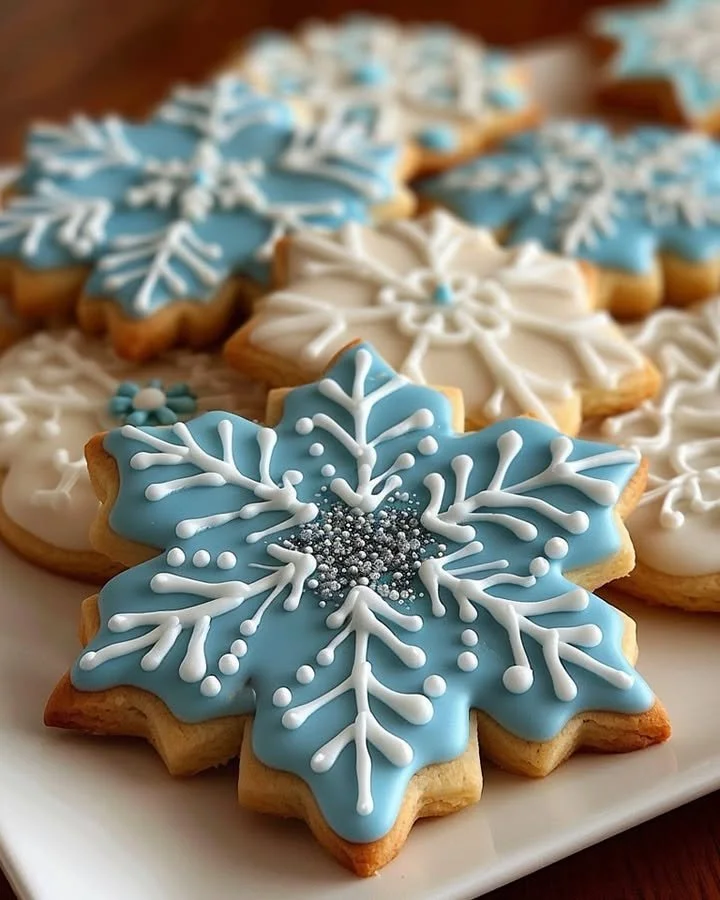
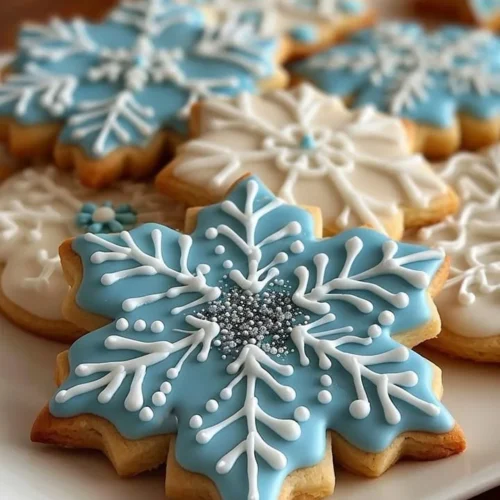
The scent of freshly baked Snowflake Sugar Cookies wafts through your kitchen, filling the air with sweet memories and festive cheer. These delightful cookies, with their intricate snowflake shapes, embody the spirit of winter celebrations. Each bite is a texture-filled journey: crisp edges yielding to a soft, tender center that melts in your mouth. Topped with luscious royal icing, these cookies aren’t just a treat; they’re a canvas for creativity, inviting you to experiment with color and patterns. Follow this recipe step-by-step to create your own batch of joy, perfect for sharing during the colder months or at special gatherings.
History / Fun Fact
Sugar cookies are believed to have originated in the early 1700s in Nazareth, Pennsylvania, where German settlers created a rich, buttery treat known as the "Nazareth cookie." The tradition of decorating cookies for various holidays began in the 18th century; however, it was during the 19th century that snowflake-shaped cookies gained popularity. The delicate designs symbolize the uniqueness of each snowflake and the beauty of winter. Over the years, these cookies have become a cherished tradition in many households, symbolizing togetherness and the joys of baking. Every snowflake cookie holds a story, and with each batch you bake, you’re not just crafting treats; you’re creating lasting memories.
Ingredients
To make these enchanting Snowflake Sugar Cookies, you’ll need:
- 2 3/4 cups all-purpose flour, evoking the earthy aroma of the kitchen.
- 1 teaspoon baking powder, a crucial element that adds lightness.
- 1/2 teaspoon salt, enhancing the sweetness.
- 1 cup unsalted butter, softened to a creamy consistency, infusing richness.
- 1 1/2 cups sugar, sparkling like freshly fallen snow.
- 1 large egg, adding moisture and binding everything beautifully.
- 1 teaspoon vanilla extract, offering a warm, aromatic hint.
- 1/2 teaspoon almond extract (optional), adding a delightful nutty nuance.
- 1 egg white (or 2 tablespoons meringue powder) for a delicate icing.
- 1 1/2 cups powdered sugar, sweet and fluffy.
- 1/2 teaspoon lemon juice, brightening the flavors.
- Food coloring (optional for decoration), perfect for adding a splash of color to your design.
Each ingredient contributes its own magic to this recipe, ensuring that your cookies look as delightful as they taste.
Cooking Time & Tips for Snowflake Sugar Cookies
Creating the perfect Snowflake Sugar Cookies takes time, but the results are well worth it. Expect about 20-30 minutes for preparation and around 10 minutes for baking, making these cookies not just a labor of love but also delightfully quick compared to more elaborate creations. Quick preparation may yield good cookies, but taking your time allows flavors to develop more fully, and the dough to rest, which can improve texture.
For success, remember to keep your butter at room temperature—too warm, and it’ll melt the dough; too cold, and it won’t mix well. When rolling out your dough, a floured surface is essential to prevent sticking. Lastly, be patient when decorating! Allow the icing to set thoroughly before serving to ensure your beautiful designs remain intact.
Step-by-Step Directions
- Preheat your oven to 350°F (175°C). The warmth will soon embrace the crispness of your cookies.
- Line baking sheets with parchment paper, creating a non-stick surface for cookie baking success.
- In a medium bowl, whisk together the flour, baking powder, and salt. The combined dry ingredients should feel light and airy, like freshly fallen snow.
- In a large bowl, beat the softened butter and sugar together until the mixture is light and fluffy. The aroma of sweet cream fills the air, evoking warmth and comfort.
- Add the egg, vanilla extract, and almond extract (if using) into the butter-sugar mix and beat until well combined, blending flavors that will sing through your cookies.
- Gradually add the dry ingredients to the wet batter, mixing until the dough comes together, forming a smooth ball that’s ready for shaping.
- Roll out the dough on a floured surface to about 1/4 inch thick. The rolling pin glides smoothly as you create a canvas for your snowflakes.
- Use a snowflake-shaped cookie cutter to cut out your cookies. Each cookie will reflect the unique beauty of winter, ready for a snowy adornment.
- Place the cookies on the lined baking sheets, allowing space for them to expand and bake for about 8-10 minutes, or untilEdges are lightly golden.
- Once baked, allow them to cool completely on a wire rack—this patience pays off when it comes to icing.
- For the royal icing, whisk the egg white or meringue powder with lemon juice until soft peaks form, bringing a lightness to your frosting.
- Gradually add powdered sugar to the mixture, continuing to whisk until stiff peaks form—a texture that will hold your designs beautifully.
- If desired, divide the icing into bowls and add food coloring to create a palette vibrant enough to adorn your cookies.
- Use a piping bag to create snowflake patterns on your cookies. Let your creativity flow as you design each delicately embellished sweet.
- Allow the icing to dry completely before serving or packaging your cookies, ensuring your artistic masterpieces are intact.
Serving Suggestions & Occasions
These Snowflake Sugar Cookies make for a delightful centerpiece at any winter gathering. They shine at holiday parties, family get-togethers, and cozy evenings spent enjoying hot cocoa by the fire. Plate them beautifully or gift them decorated in festive packaging to share your holiday spirit. For an elegant touch, pair them with a bouquet of winter greens or alongside a steaming cup of spiced tea, creating a full sensory experience.
Common Mistakes for Snowflake Sugar Cookies
One of the most frequent pitfalls when making these cookies is overmixing the dough, which can lead to tougher cookies. Be gentle when combining ingredients, and stop mixing as soon as the dough comes together. Another common mistake is not chilling the dough; this helps stabilize the butter, leading to more defined shapes when baked. Ensure your oven is preheated properly—unexpected variations in temperature can affect baking times and cookie textures. Lastly, waiting too long to decorate can cause icing to lose its pliability; keep everything organized to streamline the process.
Healthier Alternatives & Variations
While snowflake sugar cookies are typically rich in sugar and butter, variations can cater to healthier preferences. Substitute a portion of the all-purpose flour with whole wheat flour for added fiber, or explore coconut oil as a plant-based alternative to unsalted butter. For those watching their sugar intake, consider using a sugar substitute that measures cup-for-cup, ensuring you don’t lose sweetness. For a twist on flavors, try incorporating spices like nutmeg, ginger, or cinnamon into the dough for a festive spice blend that adds warmth and aroma.
FAQs
Can I freeze these cookies? Yes, Snowflake Sugar Cookies freeze well! Store them in an airtight container, and layer parchment paper between cookies to avoid sticking.
How long can I store these cookies? If stored in an airtight container, they can last up to a week at room temperature.
Is it necessary to use almond extract? No! Almond extract adds a lovely flavor, but vanilla extract alone is perfectly delightful.
Can I use powdered meringue instead of egg whites for icing? Absolutely! It’s a great option for those who prefer a shelf-stable alternative.
What if my icing is too runny? If your icing is too thin, simply add more powdered sugar until it reaches the desired consistency.
Can I decorate the cookies a day in advance? Yes, decorating the cookies ahead of time is a wonderful idea; just ensure the icing is completely dry before storing them.
Conclusion
The beauty of baking is in the creativity and joy it brings. Snowflake Sugar Cookies aren’t just treats; they’re crafted memories waiting to happen. Gather your ingredients, embrace the spirit of the season, and let your kitchen become a hub of warmth and laughter. With each snowflake cookie you create, you’ll be filling your home with the sweetest aromas and heartwarming moments. So why wait? Dive into this delightful recipe today and experience the magic of baking for yourself!
Snowflake Sugar Cookies
Ingredients
For the Cookie Dough
- 2 3/4 cups all-purpose flour
- 1 teaspoon baking powder Adds lightness.
- 1/2 teaspoon salt Enhances sweetness.
- 1 cup unsalted butter, softened Infuses richness.
- 1 1/2 cups sugar Sparkling like freshly fallen snow.
- 1 large egg Adds moisture.
- 1 teaspoon vanilla extract Offers warm aroma.
- 1/2 teaspoon almond extract (optional) Adds a delightful nutty nuance.
For the Royal Icing
- 1 large egg white or 2 tablespoons meringue powder For delicate icing.
- 1 1/2 cups powdered sugar Sweet and fluffy.
- 1/2 teaspoon lemon juice Brightens flavors.
- Food coloring (optional for decoration) Perfect for adding color.
Instructions
Preparation
- Preheat your oven to 350°F (175°C).
- Line baking sheets with parchment paper.
- In a medium bowl, whisk together the flour, baking powder, and salt.
- In a large bowl, beat the softened butter and sugar together until light and fluffy.
- Add the egg, vanilla extract, and almond extract (if using) to the butter-sugar mix and beat until well combined.
- Gradually add the dry ingredients to the wet batter, mixing until the dough forms a smooth ball.
- Roll out the dough on a floured surface to about 1/4 inch thick.
- Use a snowflake-shaped cookie cutter to cut out cookies.
- Place the cookies on the lined baking sheets and bake for 8-10 minutes or until edges are lightly golden.
- Allow cookies to cool completely on a wire rack.
Icing
- For the royal icing, whisk the egg white or meringue powder with lemon juice until soft peaks form.
- Gradually add powdered sugar until stiff peaks form.
- If desired, divide icing into bowls and add food coloring for decoration.
- Use a piping bag to create snowflake patterns on the cookies.
- Allow icing to dry completely before serving or packaging.